- Who can: a user with the “Manage Studio” permission
- Where: Studio › Workflows
What it is
A workflow is a sequence of steps the platform runs without you. A workflow starts from a trigger: a new record, a button click, a call from outside or a schedule. Then come the steps: create a task, ask a Digital Worker, check a condition, write data.
Example: a new shipment request appears in the data model, and the workflow at once gives the dispatcher a task to check the route, date, weight and body type.
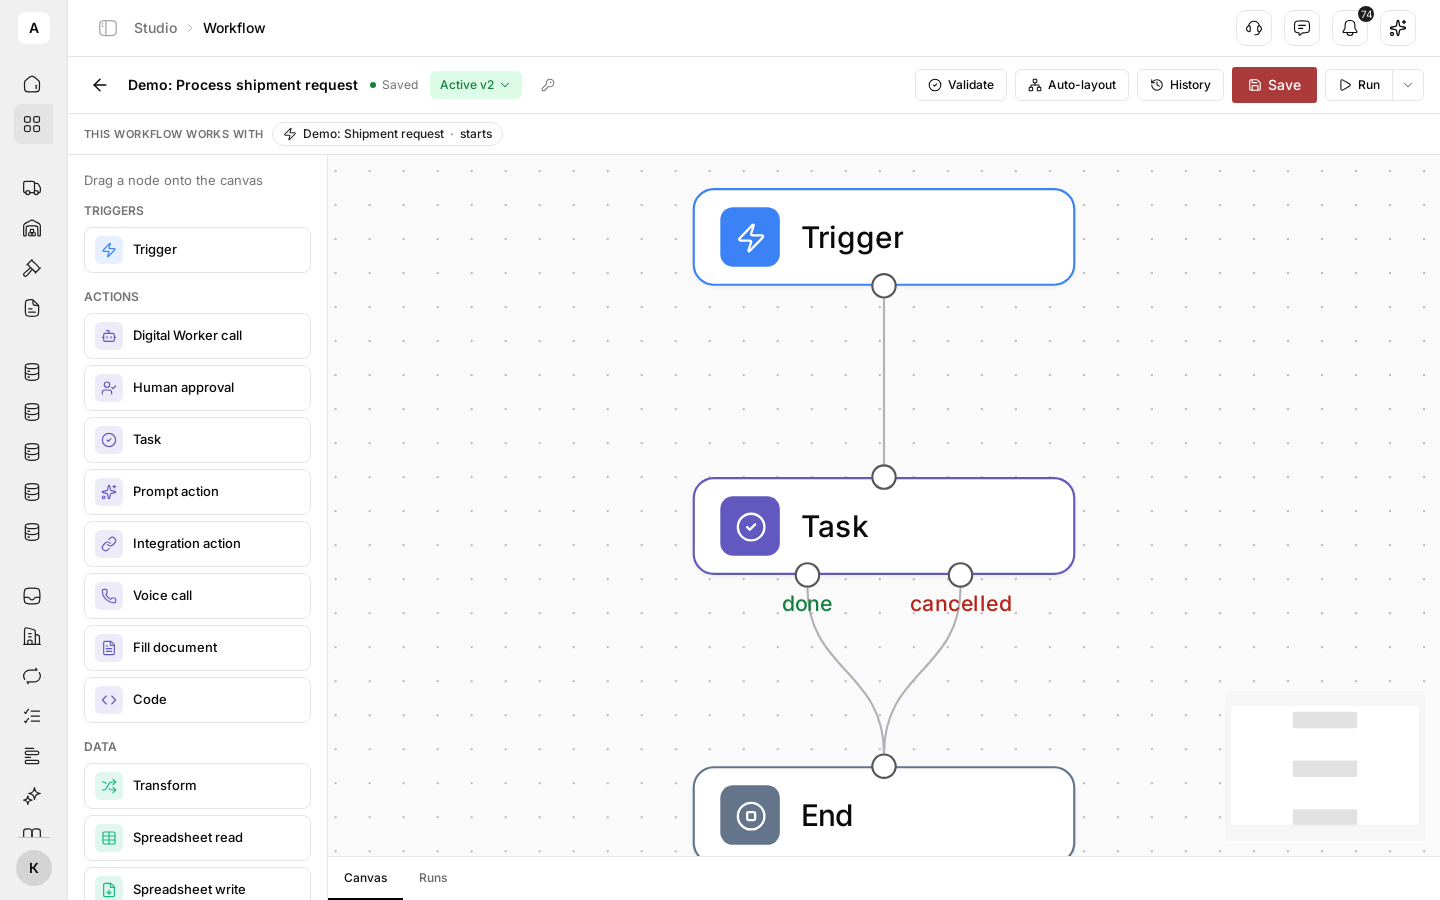
You build a workflow on the canvas from nodes joined with arrows. You edit the draft, while the published version is the one that works.
What it can do
- Four ways to start. In the “Trigger” node, the “Trigger type” field has the options “Manual”, “Event”, “Webhook” and “Schedule”.
- Start on an event. For the “Event” type, pick a “Source” from the groups “Data models”, “Forms”, “Products” or “Integrations” and the “Event” itself — for example, “… created”, “… updated” or “… deleted” for a model record. The “Attribute” and “Value” fields limit the start to records with the value you need.
- Start with a button. The “Manual” type runs the workflow from the editor. With “Show as button”, it also runs from a button in the section you pick in “Where to show”. You can also run a published manual workflow from an interface row — see Run a workflow from a row.
- Webhook. The workflow gets an address your system sends data to. The node shows the “Production URL” and “Test URL”, the “Request method” and “Authentication”: “None”, “HMAC signature” or “Header token”. Rotate secret issues a new secret, and the old one stops working at once.
- Schedule. The workflow starts on the schedule from the “Cron expression” and “Timezone” fields — for example, every morning at 08:00 Kyiv time.
- Nodes for the work. On the left of the canvas, nodes are grouped; see the table below. Create the worker for “Digital Worker call” first — see Create a Digital Worker. Connect the account for “Integration action” — see Connect an integration.
- Node help. The book button in the node's right panel opens a description: what the node does, its fields and outputs.
- Check before publishing. Validate looks for errors on the canvas: no trigger, a node connected to nothing, an output without an arrow.
- Test run. Run (test) runs the workflow on sample data you enter yourself. Many nodes have “Mock in test”: in a test, the node returns the result you set instead of doing the real action.
- Versions. Publish makes the draft the active version and archives the previous one. History shows all versions with their change summaries; you can preview each one or roll back to it.
- Runs. The Runs tab under the canvas shows every run with its status — “Running”, “Waiting”, “Completed”, “Failed”, “Cancelled” — and the input and output of each node. You can stop a run that is in progress.
- Approvals. The Approvals button above the list of workflows opens the steps that wait for a person's decision.
Nodes
Each node is described in the Node reference.
| Group | What the nodes do | Examples |
|---|---|---|
| “Triggers” | Start a run | “Trigger” |
| “Actions” | Do the work: hand it to a person or a Digital Worker, call an AI model, another system or a phone number, fill a document | “Task”, “Digital Worker call”, “Integration action” |
| “Data” | Compute values and work with rows from files | “Transform”, “Spreadsheet read”, “Aggregate” |
| “Entities” | Find, write and change records | “Entity query”, “Entity write” |
| “Flow” | Branch, wait, repeat, run branches at once or run another workflow | “Condition”, “Delay”, “Loop” |
| “Completion” | Finish the path and set the result | “End” |
How a run goes
A run starts at the trigger that fired and follows the arrows node by node. A branching node sends it down one of its outputs. While a node waits for a person, a call, a pause or another workflow, the run shows “Waiting” and goes on by itself when the wait ends. The run ends as “Completed” when it reaches “End”, “Failed” when a node fails without “Continue on error”, and “Cancelled” when someone stops it. You see each run and each node's input and output on the Runs tab.
Data between steps
Every node can read the trigger record and the results of the nodes before it. In a field, insert a path in double curly braces: the request's weight is trigger.record.data.weight_kg, the result of an earlier node is nodes.<id>.…. Nodes in “Expression” mode compute values with functions. Step by step: Use data from earlier steps.
Limits
- You cannot save a workflow without a “Trigger” node or publish it without an “End” node.
- Every node except the trigger needs an incoming arrow. “Condition”, “Loop”, “Human approval” and “Task” need both outputs connected: for a task, these are “done” and “cancelled”.
- One canvas holds one trigger of each kind: for example, one “Manual” trigger and one trigger per event.
- Only the published version works. Saved changes stay a draft until you publish it.
- A test run does not change records and does not reach outside: “Entity write” and “Entity operation” only check the data, “Integration action” sends nothing, and “Voice call” places no call. Other nodes work for real — for example, “Task” creates a real task in Tasks, and “Digital Worker call” runs the worker. To make a node do nothing in a test, turn on “Mock in test” for it, if the node has this switch: “Task” does not.
- Run live is available only after publishing and only with the “Run workflows” permission.
- A user with the “Manage Studio” permission can change, test and publish workflows. The owner and the admin have it by default; a manager does not.
- You cannot publish a workflow with an AI node whose provider has no key for your account.
Next steps
Step by step: a workflow that creates a task for every new request.
Manual, event, webhook and schedule triggers.
Insert the request's fields and earlier results into node fields.
Send a request one way or the other with “Condition” and “Switch”.
Every node: settings, results, outputs and test behavior.
Syntax and functions for dates, text and lists.
Run the workflow on a sample request through to “Completed”.
Publishing, changes, version history and rollback.
Next part: actions and instructions for the Digital Worker that helps with the check.